Cheap and Easy DIY Farmhouse Wood Signs

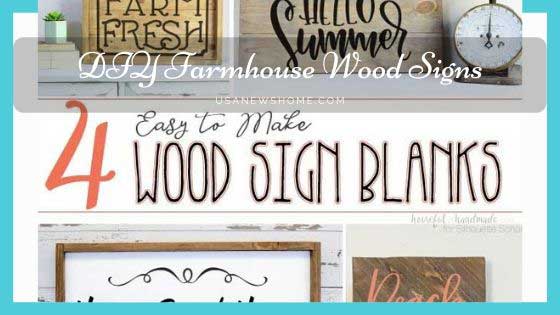
Wood signs are the hottest new decorating trend, and farmhouse style is all the rave these days. Everyone these days wants that rustic look in the house, and if you are one of those, then Cheap and Easy DIY Farmhouse Wood Signs can help you add charm and character to your space. Do you want to know how to make wood signs? Well, you have landed at the right place where I will share some information that would help you in making DIY wood signs. Without further ado, let’s get started!
Add a rustic charm to your farmhouse: DIY Wood Signs
There are times when you want a little something new and fresh for your house. But let’s face it! Many times the budget does not allow you to add a charm to your space. Painted signs are one of the best kinds of décor, but they are sometimes overpriced.
You can decorate your space with rustic wood signs too. When it comes to decorating with rustic wood signs, there are so many options available. You can find these signs at high-end department stores and home stores. But they are not cheap.
They are pricey, but it does not mean that you cannot get a rustic look in your living room or bedroom. You can make your own rustic décor than spending money on these pricey wood signs. These DIY farmhouse wood signs are cheap and easy to make.
How to make signs?
Since we all are DIYers, we would choose budget-friendly ways to decorate our space.
So, without any further, let’s walk through a few ways to make farmhouse wood signs by yourself:
- Gather your supplies for farmhouse signs:
The first thing you need to do is to gather your supplies. If you have some old pallets or boards in the home, then it’s pretty good. You can also buy wooden pallets from local establishments. Pallets are great for creating that rustic
farmhouse look. Guess what the best part is? These pallets are not expensive, and you may find them for free as well.
You can make a farmhouse sign using the underlayment board as well because it the best cheap to use for DIY wood sign. It has a smooth finish and lightweight, which means you can easily hang it on the wall.
- Cut to the size that you need:
So, take a black or colored sharpie as per your choice, printer, and printer paper. Take the underlayment board and cut it into half. You should have two boards of 2′ x 4′ each.
Use 1″ x 2″ trim boards. Choose the stain on your choice. You can use the stain left-over from other projects as well. Then get paint (choose the color you like). You need 1 ″ nail and a hammer. You can use a nail gun too.
- Paint and stain the base:
In the next step, you have to paint and stain the base. Use a paintbrush to apply stain to the underlayment board. Use the lightest pressure possible. Make sure that you allow the natural brush strokes to show. Apply a small amount as you do not want to cover the board. Then let it dry completely.
Then you have to paint over the stain lightly. Remember that in this step, you have to cover the whole underlayment board (you have chosen) in white as it gives it a rustic and aged look.
- Stain trim:
In the next step, you have to stain the trim pieces. You can use a sponge or a paintbrush to apply stain to the trim pieces.
- Build the base:
Attach the trim to the underlayment. Drive the nails into the backside of the frame. Well, make sure you do not see the nail holes from the front. Make sure that the back edges of the underlayment are not visible when you hung it to the wall. For this, you should stain its back edges.
You may need to apply a bit more stain to the seams where the trim meets in the corner. You should use 1-inch nails, as already stated in the first step. If you do not have a nail gun in the house, no problem. DIYers should make things easier so you can use your old hammer too to do the job.
- Choose a quote:
Here comes the most interesting part of the process of choosing a quote. The advantage of making a wood sign at home is that you can choose any quotes you like.
Be it a motivational quote or something about life; you can use whatever quote you want to. The best part of making a DIY farmhouse quote sign is that you can choose a color and font of your own choice.
- Print your quote:
Now you have to print out your favorite quote that you selected. You need a printer for this purpose.

Do not worry! You need that simple printer you have in your house. Print it out in black and white even if you want it to be in rainbow colors.
- Draw the words on the opposite sides:
Now you have to draw the words on the opposite side of the papers. It seems confusing, right? Let’s make it easier. Flip the paper over (you just printed) and scribble over where the letters are.
Make sure you do this in the area where you have enough light to see the words on the opposite side of the paper. To make things easier, draw the words (stenciling) on the opposite side of the paper using a pencil.
You can use a light-colored calk as well. In case you are making more than one farmhouse wood sign, then use the carbon paper method as it is quicker and easier than the pencil method.
- Place the paper on your wood sign:
In this step, you have to place the paper side down on the wood sign where you want them.
You have to place the paper’s pencil side down. Be careful in this step as your sign will look crooked if you are off even a little bit. You can use a tape measure too to be sure that you place the paper in the right spot.
- Trace the outline of the letters:
Now you have to trace the outline of printed letters onto the wooden sign you have just made. You can use a ballpoint to do this. Make sure you do not miss any details. In the beginning,
it would look a bit tedious, but the end result would be great. But you have to get every last detail for better results.
- Remove the paper:
Now you have the letters on wood from the pencil marks. How? The pressure from the ballpoint pen on the front made the pencil marks from the back.
- Get the final results:
It looks pretty cool at this stage, but you have to give your wood sign the final touches. Use a sharpie of your choice and fill the outlined pencil marks. You can use any color you want to. You can use paint to fill it, but it will be difficult to control the paintbrush while filling the outlines pencil marks.
This step may take longer to complete as you need to be very careful while filling the pencil marks. If your hand shakes even a bit, it may ruin all your efforts. Make sure that the color does not go out of the pencil marks.
- Hang up your sign:
Now you have your DIY farmhouse wood sign. The final results are fantastic. Now choose the place where you want to hang it. If, in the first attempt, it does not turn out great, you should keep trying.
Though you can buy wood signs, you would feel happier by seeing wood signs made by yourself.
Conclusion:
Making a DIY farmhouse wood sign is not that difficult. All you have to do is to be a little creative. You can make beautiful farmhouse signs by using the stuff you do not need anymore (recycle the stuff). You need to make efforts and invest time, but the end results would be fabulous. A DIY wood sign is cheaper than those available in the market.
You can ask your kids to help you out in the process. It would be a good activity for them. Ask them to help you trace the words or fill the outlined pencil marks with a sharpie. But do not ask them to help you in the step when you are using nails hammer or nail gun etc.
The best thing about making a DIY wood sign is that you can choose any color and font. Just make sure that it looks great when you hung your wood sign on the wall. You should keep the theme of the room in mind while making a DIY wood sign. It will be fun activity to do in your leisure time.
So, what are you waiting for? Create a wood sign by yourself and choose your favorite quote. Hang it on the wall and get appreciation every time a guest comes over.


